A Complete Guide to Lubricating Your RV Slide-Outs
Table of Contents
You’ve set up camp and pressed the switch to extend your RV slide, but instead of a smooth glide, you hear grinding or nothing at all. A jammed slide-out isn’t just frustrating; it can also lead to repair bills in the thousands if motors, gears, or tracks are damaged.
A slide-out (the extendable room section that increases your RV’s living space) moves heavy loads every time you use it. Without routine care, dirt, rust, and friction build up, straining the system, shortening its lifespan, and turning minor issues into costly breakdowns.
The good news: lubricating RV slide-outs is simple and inexpensive. In this guide, you’ll learn why lubrication matters, how often to do it, what tools and products to use, and the step-by-step process for maintaining different slide-out systems. And if you’d rather leave it to the pros, Good Sam RV ProCare offers trusted mobile repair services across multiple states.
Why Lubrication Matters for Slide-Outs
Slide-outs may look simple from the inside, but underneath, they rely on gears, rails, and motors moving thousands of pounds every time you set up camp. Without proper lubrication, these components face constant friction and wear.
Lubrication creates a protective layer that:
- Prevents wear and tear by reducing metal-on-metal contact.
- Shields against rust and dirt buildup, especially in coastal, humid, or desert environments where corrosion and grit are common.
- Keeps the operation smooth, so motors don’t strain, which extends the life of the entire system.
Without this protection, even minor resistance can snowball into major repairs. Slide motors alone can cost hundreds of dollars to replace, and damaged tracks or brackets often run into the thousands.
The bottom line: lubricating RV slide-outs isn’t just about convenience. It’s a small step that protects one of the most expensive systems in your RV and ensures your slides extend and retract smoothly, trip after trip.
How Often Should You Lubricate RV Slide-Outs?
There’s no single schedule that works for every RVer. A good rule of thumb is to lubricate your slide-outs every 3-6 months or as recommended by your RV manufacturer. However, your usage, climate, and storage conditions all play a role in how often you’ll need to do it.
By Usage:
- Weekend Campers: Twice a year, usually at the start of camping season and again before storage.
- Frequent Travelers: Every 2-3 months if you’re logging thousands of miles a year.
- Full-Timers: Monthly lubrication, since slides are in constant use.
By Climate or Storage:
- Coastal or Humid Areas: Salt air and moisture accelerate rust, so lubricate more frequently.
- Desert Environments: Dust and sand infiltrate tracks and gears, requiring extra care.
- Stored Outdoors: Exposure to weather calls for more frequent attention than indoor storage.
Warning Signs You're Overdue:
- Grinding or scraping sounds when extending or retracting.
- Jerky or uneven movement.
- Slower operation than usual.
- Visible rust or dirt buildup on rails or gears.
If you notice any of these issues, don’t wait to schedule your next service. Lubricating RV slide-outs right away can prevent bigger problems down the road and extend the life of your slide-out system.
Tools and Supplies You'll Need
Before you get started, gather everything you’ll need so the job goes smoothly. The right tools make lubricating RV slide-outs faster, safer, and far less messy.
Slide-Out Lubricant:
- Always choose a dry lubricant designed for RV slide-outs. These lubricants are applied as a wet spray but quickly dry, forming a protective film that doesn’t attract dirt or debris.
- Avoid wet lubricants, grease, or standard WD-40. These can trap dust and grit, creating an abrasive paste that wears down parts instead of protecting them.
Cleaner or Degreaser:
- Use a mild degreaser or RV-safe cleaner to remove old lubricant, dirt, and grime before applying a fresh coat.
- Cleaning first ensures the new lubricant bonds properly.
Microfiber Cloths or Rags:
- Essential for wiping down tracks and gears during cleaning.
- They are also useful to catch any overspray when applying lubricant.
Protective Gloves and Safety Gear:
- Wear gloves to protect your hands from sharp edges and chemicals.
- Safety glasses are a good idea if you’re working under the slide.
Optional but Helpful:
- A flashlight or a headlamp to see into dark or tight spaces.
- A step stool or a small ladder for safe access to higher slide mechanisms.
- Compressed air for blowing dust and grit out of gears and tracks before cleaning.
With these basics on hand, you’ll be ready to clean, lubricate, and protect your slide-outs like a pro – keeping them reliable season after season.
Step-by-Step: How to Lubricate RV Slide-Outs
Keeping your slide-outs moving smoothly isn’t difficult, but it does require the right process. Follow these steps carefully to get the best results.
1. Preparation
- Park your RV on a level surface, set the parking brake, and switch off the power so the slide can’t move while you work.
- Fully extend the slide-out to access the entire track, gears, and cables. Partial extension won’t give proper reach.
- Before applying lubricant, clean the mechanism thoroughly:
- Use a brush or compressed air to clear dirt, leaves, and debris.
- Wipe rails, gears, and joints with a mild cleaner or degreaser.
- Finish with an isopropyl alcohol spray for a clean, dry surface.
Cleaning first is essential. Applying lubricant over residue creates a gritty paste that accelerates wear instead of reducing it.
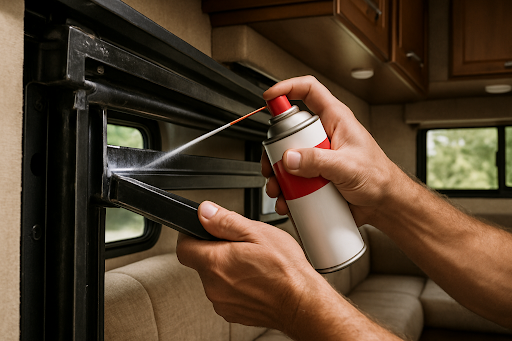
2. Lubricating the Mechanism
- Once everything is clean and dry, hold the spray can about 6-8 inches from the surface and use short, controlled bursts rather than one long spray.
- Cover:
- The full length of the rails.
- All visible gear teeth.
- Moving joints and pivot points.
- Cable pulleys (if present).
- Apply just a light, even coating. More isn’t better – too much lubricant takes longer to dry and can attract dirt.
Important: Avoid spraying rubber seals unless you’re using a conditioner designed specifically for them. Regular slide lubricants can damage seals, causing them to crack or swell.
3. Operate the Slide In and Out
- After applying the lubricant, run the slide in and out several times to distribute the product evenly. It also helps you spot any areas you might have missed.
- As the slide moves, listen carefully. A properly lubricated system should operate smoothly and quietly.
- If grinding, hesitation, or jerky movement continues after lubrication, it may indicate a deeper mechanical issue that needs professional attention.
Lubrication Based on Slide-Out Type
Not all slide-outs are the same, and each requires specific care. Knowing your system helps you lubricate correctly and avoid damage.
Rack and Pinion
It is one of the most common and durable RV slide-out systems, which uses a toothed rail and gear. Apply dry lubricant along the rack and on the gear teeth where they mesh. Without lubrication, gears may grind and wear quickly.
Hydraulic
These systems use rams and fluid to move heavy rooms. Lubricate only the tracks and guides that keep the slide aligned. Never treat the rams or cylinders; they need specialized service. If you notice leaks or pressure loss, call a professional.
Cable-Driven
Cable systems use pulleys and cables for lighter slides. Apply a light coat of dry lubricant to visible cables and pulley bearings only. Avoid spraying interior components, as incorrect lubrication can cause damage.
Schwintek (In-Wall Rack and Pinion)
Schwintek systems are recognized by their aluminum side tracks, but they actually operate using an in-wall rack and pinion system, not a worm gear. Many newer models are designed to be self-lubricating, meaning no maintenance is needed. For older systems, however, you can apply a small amount of dry lubricant to the bearing blocks (gibs) behind the seals to reduce friction and ensure smooth movement. Avoid lubricating the rack and pinion gears themselves, as excessive lubrication can cause improper functioning and potential damage.
Looking for professional help instead? Good Sam RV ProCare provides mobile slide-out repair services, so you can have your concerns handled right at your campsite.
Maintaining Slide-Out Seals and Gaskets
While gears and rails keep the slides moving, rubber seals and gaskets protect your RV’s interior from water, drafts, and pests. Neglecting them can lead to leaks, mold, or cracked seals that no longer block the elements.
Seals need special care because rubber naturally dries and cracks over time, especially in harsh climates. UV rays, heat, and freezing temperatures accelerate wear. And once elasticity is gone, seals no longer press tightly, leaving gaps where water can seep in.
To extend their lifespan, apply a rubber seal conditioner several times a year. These sprays keep material soft, pliable, and resistant to cracking. However, be sure to always use products labeled safe for RV seals, as household cleaners or petroleum-based sprays can dry the rubber out.
Finally, make cleaning and inspection part of your routine:
- Wipe seals with a damp microfiber cloth to remove dirt and debris.
- Cleaning the top, bottom and sides of the slide-out of any debris and waxing the sidewalls.
- Inspect closely for cracks, tears, or sections pulling away from the frame.
Catching small issues and damage early makes repair or replacement easier before it leads to bigger problems.
Common Mistakes to Avoid
Even with the best intentions, slide-out lubrication can cause problems if it’s done incorrectly. Here are some pitfalls to steer clear of:
Over-Lubricating or Using the Wrong Product
More isn’t always better. Applying too much lubricant can cause buildup that attracts dirt and grit, creating the same friction you were trying to prevent. Likewise, using household oils or grease instead of a dry slide-out lube can gum up the mechanism and damage sensitive parts.
Spraying Seals with the Wrong Lubricant
Slide-out seals need conditioners, not general-purpose lubricants. Spraying them with the wrong product can cause the rubber to dry out, crack, or lose flexibility. Always use a seal-safe product designed specifically for RV rubber.
Ignoring Early Warning Signs
Grinding noises, stiff movement, or visible rust are clear signals that your slide-outs need attention. Ignoring them and delaying maintenance can turn a simple lube job into costly repairs involving motors, gears, or even full system replacements.
Conclusion
Regular lubrication isn’t just routine upkeep – it’s what keeps your RV’s heaviest moving parts reliable, season after season. Make it part of your scheduled maintenance, right alongside tires, batteries, and roof care. A few minutes of attention now can save you thousands later and ensure your slide-outs extend smoothly every time you travel.
For RVers who want added peace of mind, Good Sam RV ProCare provides mobile slide-out repair services in:
Frequently Asked Questions (FAQs)
What lubricant should I use on RV slide-outs?
Use a dry silicone or Teflon-based lubricant designed for RV slide-outs. These products protect against friction and dirt without leaving sticky residue that attracts debris. Avoid heavy greases unless your manufacturer recommends them.
How often do you lubricate RV slide-out seals?
Condition your seals every 3-6 months. If you travel in harsh climates such as humid, coastal, or desert regions, you may need to treat them more frequently to prevent cracking or drying.
How do I know when my slide-out needs lubrication?
Watch for signs like grinding noises, jerky or slow movement, or visible rust or dirt on the tracks. These are clear indicators that it’s time to lubricate your RV slide-outs.
Is it safe to lubricate RV slide-outs myself?
Yes, most RV owners can handle lubrication on their own with the right products and a few minutes of preparation. Just be sure to follow your manufacturer’s guidelines and avoid spraying directly on rubber seals unless you’re using a seal-safe conditioner.
My slide is making noise after lubrication – is this normal?
Some light noise may persist the first few times you run the slide after lubrication, but it should improve as the lubricant distributes. If grinding or resistance continues, check for dirt buildup or damage.
Can I lubricate while the slide is extended or retracted?
Always extend the slide fully before lubricating. This gives you clear access to the rails, gears, and moving parts, and ensures even coverage.