How to Clean and Maintain Your RV Toilet: Expert Tips to Prevent Odors, Clogs and Costly Repairs
Table of Contents
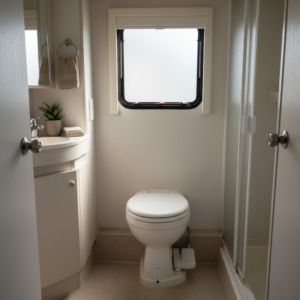
One stubborn stain or lingering whiff in an RV toilet might seem harmless, but it can set the stage for cracked seals, dripping valves, or worse, a black-tank replacement that wrecks both budget and travel plans. The good news? Keeping your RV toilet in top shape is far easier than most newcomers think. This guide will walk RV owners through the process of cleaning RV toilet fixtures and maintaining every component, without any prior plumbing know-how. Whether your rig has a porcelain gravity-flush, a lightweight plastic bowl, or a cassette-system for off-grid adventures, the steps that follow apply across the board. You’ll learn how to banish odors at the source, keep seals flexible, and spot early warning signs before they evolve into vacation-ending breakdowns.
Remember, RV toilet care isn’t just about a clean toilet bowl or fresh scent. When done right, it protects gaskets, vent stacks, sensors, and, ultimately, your entire waste system from costly damage.
RV Toilet Types & Their Unique Needs
Not all RV toilets play by the same rules. Use the wrong cleaner, or skip the wrong step, and you risk scratching, cracking, or damaging an otherwise healthy system. By tailoring your routine to the toilet’s material and design, maintaining and cleaning RV toilets stays quick, safe, and effective.
A. Porcelain RV Toilets
Porcelain models feel residential – sturdy, easy to wipe, and naturally stain-resistant – but they hide two vulnerabilities. First, mineral-rich campground water can leave gray or rust-colored rings that etch the surface if scrubbed with abrasive powders or stiff brushes. Second, in freezing temperatures, trapped water can expand and spider-crack the glaze or deform the seal.
Care Priorities:
- Non-Abrasive Cleaning Routine: Stick to a baking-soda paste or RV-safe gel cleaner to dissolve deposits without scratching.
- Seal Conditioning: Finish each deep clean with a silicone-based valve lubricant to keep seals supple and block sewer gas from escaping.
- Freeze Protection: Before winter storage, pour one cup of pink RV antifreeze into the bowl and press the foot pedal halfway to coat the seals and the P-trap.
B. Plastic / Polyethylene RV Toilets
Polyethylene resists impact better than porcelain but is more vulnerable to sunlight and harsh chemicals. Micro-scratches from stiff brushes can trap waste residue, creating lingering odors and bad smells. Over time, UV exposure also dulls the surface, robbing the bowl of its glossy finish and making those micro-scratches even harder to clean.
Care Priorities:
- Enzyme-Based Cleaners: These biological formulas break down waste without damaging plastic. Spray the toilet, let sit, and rinse – no harsh scrubbing needed.
- UV Protection: Mist the exterior and exposed seat with 303 Aerospace Protectant or a comparable UV guard every few months; think of it as sunscreen for your toilet.
- Gentle Tools: Trade the stiff toilet brush for a soft microfiber pad or rubber-blade wand. If you hear scraping, it’s time to switch tools.
C. Cassette RV Toilets
Unlike gravity-flush models, cassette units use a slide valve that opens straight into the portable tank. When that seal dries out, odors escape and liquids seep into the valve track, corroding the metal guides. Inexperienced dumping – rapid emptying with no rinse – leaves thick residue that throws off level sensors and shortens tank life. This is where a composting toilet might offer different maintenance, but for cassette systems, these steps are crucial.
Care priorities:
- Monthly Slide-Seal Lubrication: Use only manufacturer-approved silicone grease. Petroleum-based products can swell rubber and jam the slide.
- Two-Stage Rinsing: After the first dump, add two liters of water, cap the tank, slosh gently, and empty again. This second rinse removes sediment before it hardens.
- Quarterly Leak Test: Fill the cassette with clean water, set it on cardboard for thirty minutes, and watch for damp spots. It’s better to discover leaks at home than mid-journey.
By matching your maintenance routine to the toilet you own, you’ll extend its lifespan, eliminate odors at the source, and make every RV toilet cleaning session short enough to get back to the parts of RVing that smell a whole lot better.
RV Toilet Tools & Materials Checklist
Nothing derails a “quick” RV toilet cleaning session faster than realizing the right brush or treatment pod is 40 miles away. Stock this compact kit in a dedicated bin so you can handle routine scrubbing, odor control, and minor repairs without an emergency trip to the big-box store. This can be much cheaper than unexpected repairs.
Cleaning Kit Must-Haves
- Soft-Bristle Toilet Brush: Avoid stiff or metal bristles; they scratch the bowl and trap odors.
- RV-Safe Gel Cleaner: Products like Camco TST cling to the bowl, dissolving buildup, and rinse clean without harming sensitive seals.
- Rubber Gloves and Biodegradable Wipes: Protect your hands and sanitize pedals, lids, and the flush lever after each deep clean.
Odor & Clog Prevention
- Ammonia-Free Tank Treatment Pods: Enzyme- or bacteria-based drop-ins digest waste without harming septic systems or sensor probes. This is a crucial part of your toilet treatment.
- Food-Grade Silicone Lubricant: A quick bead around flush seals every month preserves flexibility and blocks sewer gas.
Emergency Fixes
- Wax-Ring Replacement Kit: Ideal for gravity-flush models if a sudden leak appears at the bowl base. Compact, lightweight, and avoids expensive RV-specific service calls.
- Integrated Black-Tank Rinser: This screw-on pressure sprayer blasts residue off tank walls and restores sluggish sensors after a stubborn clog.
Step-by-Step RV Toilet Cleaning Guide
A predictable rhythm of daily touch-ups, monthly resets, and seasonal prep can turn cleaning the RV toilet into a quick habit instead of a messy headache. Follow these three tiers to keep your bowl, seals, and sensors in top shape year-round.
A. Daily / Weekly Routine
- Neutralize Odors with a Baking-Soda Flush:
- Dissolve 1 cup baking soda in 1 gallon of warm water (the heat activates the soda faster).
- Pour the mix into the bowl, hold the flush pedal halfway down for about five seconds so it coats the flush seal, then press fully to send it down. This buffers tank acidity and knocks down sulfur smells without harsh chemicals.
- Wipe-Down High-Touch Surfaces:
- Clean the seat, lid, pedal, and surrounding floor with alcohol-free biodegradable wipes. Alcohol dries plastic and rubber over time, while residue-free wipes leave a protective film that repels dust and grime.
- Pro Tip: Keep a travel-size pack tucked behind the toilet so every family member can give the bowl a quick wipe down after use.
- Check Water Seal:
Look for at least an inch of standing water in the bowl. Low levels can hint at a drying flush valve seal that needs lubricant before it warps. Sure to use the correct amount of water.
B. Deep Cleaning (Monthly)
Spend 30 minutes once a month to reset your waste system and extend the life of key components. This contributes to a good tank clean.
-
- Empty and Flush the Black Tank First:
-
Drain the holding tank completely. Then, briefly open the gray valve to rinse out the hose. Starting with a clean slate prevents backflow during scrubbing.
-
- Scrub the Bowl (without Bleach):
-
Spray the toilet with an RV-approved gel (e.g., Camco TST or Thetford Aqua-Clean). Let it sit for five minutes so the enzymes dissolve the mineral buildup and biofilm.
- Scrub from the waterline upwards using a soft-bristle brush or rubber-blade wand. Avoid stiff brushes as they can scratch surfaces and trap odors.
-
- Clean the Spray Wand or Water Jet:
- Wrap the nozzle with a vinegar-soaked paper towel for 15 minutes to dissolve mineral deposits. Then, gently brush with an old toothbrush.
- Condition the Flush Seal:
- Dry the seal with a microfiber cloth. Run a fingertip of food-grade silicone around the gasket until it gleams.
- Pump the pedal twice to spread lubricant and verify the bowl holds water again.
- Recharge the Tank:
- Drop an ammonia-free, enzyme-based treatment pod into the bowl. Add two quarts of water, and flush. This keeps sensors accurate and waste breakdown consistent.
- Empty and Flush the Black Tank First:
C. Seasonal Prep
Weather extremes and long-term storage need extra precautions to prevent damage and preserve system performance for your Recreational Vehicle.
-
- Winterizing (for Cold Climates)
- After the final dump, rinse the tank until the discharge runs clear.
- Use an air-compressor adapter to blow 40 PSI through the sprayer, rinse line, and toilet inlet until no mist appears. Any water left in fittings can freeze and crack fittings.
- Pour one cup of pink RV antifreeze into the bowl and depress the pedal just enough to seat the seal. This cushions rubber and protects the P-trap from freeze damage.
- Summer Storage (for Hot Climates)
- Inspect plastic hinges, seat bolts, and vent-pipe collars for UV damage or hairline cracks. Replace anything brittle before road vibrations make it worse.
- Add an extra enzyme pod and two quarts of water to the black tank. Keeping the environment slightly moist activates beneficial bacteria and prevents dried solids from hardening.
- Any Long-Term Lay-Up
-
Close the roof vent and crack a small window to maintain airflow and limit humidity around the seals. Consider running the bathroom fan periodically.
-
Tape a reminder on the fridge: “Cycle toilet seal on the first of every month”. Stepping in to press the pedal a few times redistributes antifreeze or lubricant and keeps the valve from sticking.
-
- Winterizing (for Cold Climates)
Troubleshooting Common RV Toilet Issues
Even with a solid routine for cleaning the RV toilet, things can occasionally go sideways. Use this quick-reference guide to pinpoint trouble and fix it before it ruins your weekend.
Persistent Odors
- Inspect the Roof-Vent Pipe: Wasps, birds, or blown debris can block airflow and trap sewer gas. Shine a flashlight down the vent and use a zip-tie or wire to clear the obstruction.
- Review your Tank Treatment: Enzyme pods work continuously, but even a single splash of household bleach can kill odor-eating bacteria for weeks. Switch back to an enzyme-based treatment and wait 24 hours for results.
- Check Water Level in the Bowl: Check Water Level in the Bowl: A dry flush seal allows sewer gas to rise. Add a quart of water and confirm the valve holds it. This is a common source of bad smells.
Stubborn Clogs
- Avoid Chemical Drain Openers: Products like Drano can melt seals and warp plastic. Never use them in RV plumbing.
- Try the 5-Gallon Bucket Flush: Fill a bucket with warm water. Standing on a step stool, pour straight down the bowl in one swift motion. The weight and force can often dislodge tight pyramid plugs. This can help tackle stubborn blockages.
- Finish with a Tank Rinser: Use a built-in sprayer or wand to blast loosened waste off the walls and flush it out through the drain.
Leaks Under the Toilet
- Wax Ring Sweat Line: A damp or smelly ring at the toilet base usually means the fresh wax or foam gasket has failed. Turn off the water, remove two bolts, lift the toilet, and install a new seal. This 30-minute job can prevent plywood floor rot.
- Hairline Bowl Crack: If water seeps from the mid-bowl area, the fixture is likely compromised, and replacement is the safest solution.
Preventative Maintenance Schedule
A timeline keeps small tasks from slipping through the cracks, literally.
After Each Trip
- Rinse the Black Tank: Flush until discharge runs clear. Leftover sludge hardens like concrete and throws off level sensors.
- Pre-Load with Water and Enzymes: Pre-Load with Water and Enzymes: Add two quarts of water and drop in an enzyme pod before storage. This jump-starts bacterial digestion and prevents odors from sitting in. Sure to use the recommended brand for your toilet treatment.
Every 3 Months
- Inspect Flush Seals: Use a flashlight to check for dryness or cracking. If seals feel sticky, reapply food-grade silicone.
- Test Valve Responsiveness: Press the pedal and note how it rebounds. A slow or sluggish return hints at a gummed-up linkage or a weak return spring.
Annually
- Schedule a Professional Inspection: Have a certified tech pressure-test vent stacks and scope inside the tanks, especially before long trips. These are the areas most owners cannot access.
- Replace Aging Hardware: Swap out plastic seat bolts, UV-faded vent caps, and any hose showing sun damage or surface cracks. Ensure your entire plumbing system is in good order.
When a Quick Clean Won’t Fix It: 3 Sure Signs You Need a Repair
Even a solid routine for cleaning the RV toilet can’t solve every problem. If you notice any of these issues, it’s time to call a tech and let the pros handle any general maintenance and repairs your RV toilet may need.
- Persistent Odors That Won’t Go Away: A fresh enzyme pod and a water-filled bowl should knock out odors. If the smell lingers, the wax or foam ring beneath the toilet is probably cracked and letting sewer gas escape. This indicates a lack of a sanitary seal.
- Stains or Cracks You Can’t Remove: Hard-water rings come off with gel cleaner. But if dark lines remain, you’re likely dealing with fine cracks. If water seeps through or light shines when you lift the lid, replace the bowl before it damages the floor.
- Recurring Clogs: A one-time clog is normal. Constant backups mean the flush valve isn’t sending enough water through, pointing to a worn or obstructed component. If your toilet paper isn’t dissolving properly, or you’re using too much tissue, this can attach to the sides and cause problems.
If that’s the case, our RV toilet replacement service can take care of the problem quickly—so you’re not stuck with leaks, odors, or non-functional systems mid-trip.
Bottom line: Regular maintenance prevents most trouble, but these warning signs tell you a part has failed and needs replacing before a small issue becomes a big repair bill.
Wherever You Travel, We’re Ready to Help
At Good Sam RV ProCare, we share your love for the camper lifestyle and RV living. Whether you’re parked at a campsite or on the move, give us a call at 833‑782‑2731 to find out if our mobile RV services are available in your area. Our On-site services are here to help.
Wrap-Up: Simple RV Toilet Care to Keep Big Problems at Bay
Regular RV toilet maintenance doesn’t just keep things clean. It protects your plumbing, extends component life, and prevents surprise breakdowns that can derail a trip. With a few basic tools, consistent care, and attention to your toilet’s unique needs, you’ll avoid odors, clogs, and expensive RV-specific repairs. Whether you’re prepping for a long-haul adventure or storing your rig for the season, these habits make a real difference.
Stay ahead of issues and enjoy more miles with fewer messes. Don’t let toilet troubles ruin your trip – get reliable help from Good Sam RV ProCare. Don’t let bad smells suck the fun out of your trip!
Frequently Asked Questions (FAQs)
Can I use Clorox wipes?
Yes – but only on the seat and lid. Avoid using bleach inside the bowl, as it can dry out rubber seals and kill enzyme-based tank treatments. Stick to an RV-safe store brand cleaner for the bowl.
Why does my toilet still smell after cleaning?
A dry bowl seal or blocked roof vent could be the issue. Add a little water to the bowl to reseal it, and check the vent pipe for obstructions like bird nests or debris. Address the issue promptly.
How do I find a good mobile RV toilet repair tech near me?
You can search RVTAA.org by ZIP code, ask a nearby campground office, or contact Good Sam RV ProCare for trusted mobile RV service in your area, even if you are in a remote location.